
sudo privileges in the next piztu version, in this version it is required, and it must run without prompting for a password.
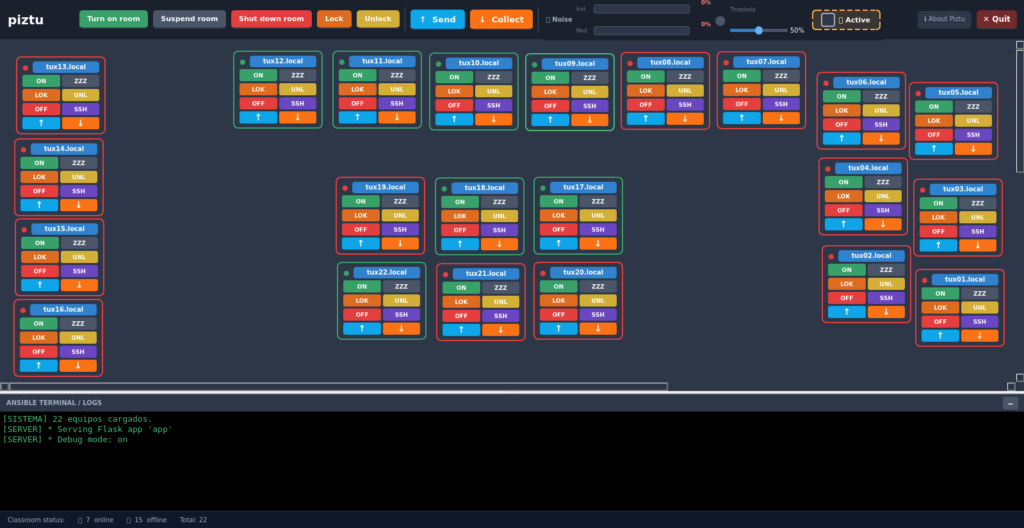
Piztu is built on Python and Ansible. The automation engine is Ansible, which runs actions on the classroom computers over SSH with public-key authentication: an agentless model where clients only need OpenSSH and sudo, while every operation (power on, suspend, shut down, lock, send or collect assignments) is launched in parallel as a playbook, with Wake-on-LAN support for remote power-on. On top of that engine, the entire server side is written in Python: the web interface relies on Flask and Flask-SocketIO (real-time WebSockets for the noise VU meter, transfer progress and an SSH terminal embedded in the browser), the desktop application is built with PyQt6, and a standalone noise monitor captures the microphone with arecord to issue warnings and automatic lockdowns. Configuration is centralised in a YAML file, persistent data (computer positions and noise threshold) is stored in SQLite, the interface is multilingual (Galician, Spanish, English and Portuguese) and the graphical installer is written in Go with the Fyne framework.
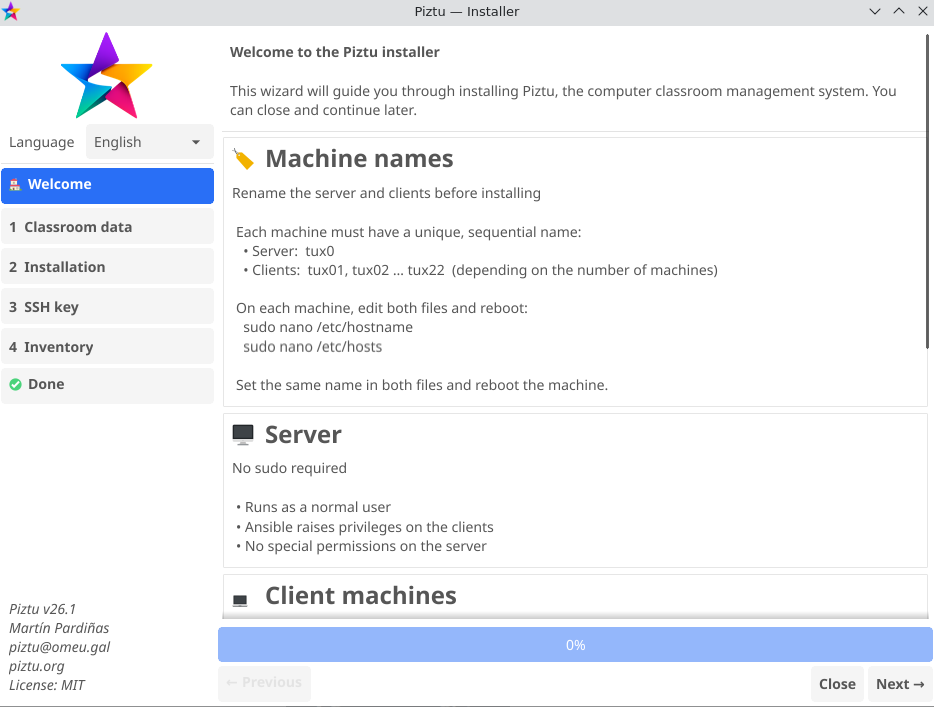
Installation steps
The first thing to do is rename the classroom computers with a name followed by the computer number, for example: tux01, tux02… You should do this by editing the /etc/hosts and /etc/hostname files:
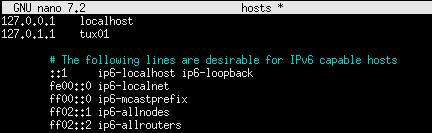
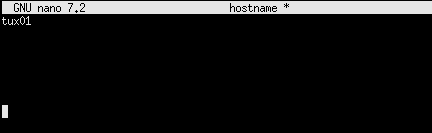
You also need to install openssh-server on the clients, so the server can access them:
$ sudo apt update
$ sudo apt install openssh-server
Next, edit the SSH service configuration file, uncommenting or changing these lines:
$ sudo nano /etc/ssh/sshd_config
Port 22
PermitRootLogin yes
PubkeyAuthentication yes
PasswordAuthentication yes
And finally, you must grant sudo privileges to the default user on the clients:
$ su root
# visudo
and add:
usuario ALL=(ALL) NOPASSWD:ALL
On the server side, Python 3 must be installed.
Piztu application features
a. Power management
- Power on classroom — turns on the computers over the network via Wake-on-LAN (magic packets), with no need to touch them physically.
- Suspend classroom — suspends the computers to save energy while keeping them ready to resume.
- Shut down classroom — shuts down all computers in an orderly way (with a prior confirmation to avoid mistakes).
These can be applied to the whole classroom at once or to a specific computer from its card on the map.
b. Locking and class control
- Lock — locks the screens of all computers (or the selected ones) to get the students’ attention at a given moment.
- Release — unlocks the computers. Includes automatic verification with retries to make sure none of them remained locked.
c. SSH terminal
- SSH — opens a remote terminal to any computer directly from the interface (embedded in the browser with xterm.js, or in the desktop GUI), for administration or diagnostics without leaving your seat.
d. Noise control
- Noise monitor — watches the classroom microphone and computes the moving average of the last 30 s. If it exceeds the threshold set by the teacher, it warns students on their screens; if the noise persists for another 30 s, it automatically locks the computers. The threshold is adjusted with a slider.
e. Sending and collecting assignments
- Send assignment — distributes files to the computers (drag and drop), to all of them or to a manual selection.
- Anti-copy mode — sends different files to even- and odd-numbered computers (sorted by the number in their name), useful to prevent copying during exams.
- Collect work — downloads each computer’s assignments folder to the server via SFTP.
- File explorer — browse the work collected from each computer and download it individually or as a ZIP.
- Clear folder — deletes the contents of the assignments folder on the selected computers.
f. Interactive classroom map
- Represents each computer as a card with a status indicator (online/offline) and a badge showing the collected files. Cards can be dragged to mirror the real physical layout of the classroom (saved automatically).
g. Other
- Multilingual interface (Galician, Spanish, English, Portuguese).
- About Piztu — authorship, version, contact and licence information.
Configuring computers and installing software with Ansible
Every Piztu action on the computers is, under the hood, an Ansible playbook. That means you can configure the classroom computers and install software on all of them at once just by writing (or reusing) a playbook. No need to touch each computer: Ansible connects over SSH and does the work in parallel.
The three pieces
1. The hosts file (inventory)
Defines which computers make up the classroom. Each line is one computer, grouped under [aula]:
[aula]
tux01.local mac=c4:34:6b:7a:a1:a8
tux02.local mac=00:23:24:9c:fa:cd
...

[aula:vars]
ansible_become=yes                              # escalates privileges with sudo
ansible_become_method=sudo
ansible_python_interpreter=/usr/bin/python3
[aula]is the group the playbooks target (hosts: aula).- The
mac=value is used by Wake-on-LAN to power computers on. [aula:vars]applies common variables to all of them (here, automatic sudo).
2. The playbooks/ folder
Each .yaml is an action. Several come bundled: acenderAula, bloqueoTotal, visualstudiocode, instalar_lamp… To add a new capability, just create a playbook here.
3. The mapping in config.yaml
The logical names used by the interface are resolved to real files in:
ansible:
  grupo_aula: "aula"
  playbooks:
    acender: "acenderAula"
    bloqueo: "bloqueoTotal"
    # add yours here: logical_name: "file_name_without_extension"
How to run a playbook
Manually (the whole classroom):
$ ansible-playbook -i hosts playbooks/visualstudiocode.yaml
Only on some computers (with --limit):
$ ansible-playbook -i hosts playbooks/visualstudiocode.yaml --limit tux01.local,tux02.local
Examples
Example 1 — Install a simple program (GIMP) on the whole classroom
---
- name: Install GIMP on the whole classroom
  hosts: aula
  become: yes
  tasks:
    - name: Install the gimp package
      apt:
        name: gimp
        state: present
        update_cache: yes
Example 2 — Install several packages at once
---
- name: Programming tools
  hosts: aula
  become: yes
  tasks:
    - name: Install packages
      apt:
        name:
          - python3-pip
          - git
          - build-essential
        state: present
        update_cache: yes
Example 3 — Install from an external repository (VS Code, already included)
---
- name: Install Visual Studio Code
  hosts: aula
  become: yes
  tasks:
    - name: Import Microsoft's GPG key
      apt_key:
        url: https://packages.microsoft.com/keys/microsoft.asc
        state: present
    - name: Add the repository
      apt_repository:
        repo: "deb [arch=amd64] https://packages.microsoft.com/repos/code stable main"
        state: present
    - name: Install code
      apt: { name: code, state: present, update_cache: yes }
Example 4 — Configure the computers (copy a configuration file)
---
- name: Distribute a common wallpaper
  hosts: aula
  become: yes
  tasks:
    - name: Copy the image to the computer
      copy:
        src: /opt/piztu/recursos/fondo.png
        dest: /usr/share/backgrounds/aula.png
        mode: "0644"
Example 5 — Change a system option (enable NumLock, already included)
---
- name: Enable NumLock at startup
  hosts: aula
  become: yes
  tasks:
    - name: Install numlockx
      apt: { name: numlockx, state: present }
    - name: Enable NumLock
      command: numlockx on
Example 6 — Uninstall a program
---
- name: Remove games
  hosts: aula
  become: yes
  tasks:
    - name: Remove gnome-mines
      apt:
        name: gnome-mines
        state: absent
Integrating a new playbook into the Piztu interface
- Save your
.yamlinplaybooks/(e.g.playbooks/instalar_gimp.yaml). - Give it a logical name in
config.yaml:ansible: playbooks: instalar_gimp: "instalar_gimp"
- Call it from the interface with the
executar_comandoevent (actioninstalar_gimp), and Piztu launches it against the wholeaulagroup automatically.
You can also always run it manually with
ansible-playbook -i hosts playbooks/..., without going through the interface.