
This document details the procedure for setting up Epoptes in a computer lab using mDNS name resolution (Avahi). This method allows interconnection between devices in networks with dynamic IP addressing (DHCP), eliminating the need to configure static IPs.
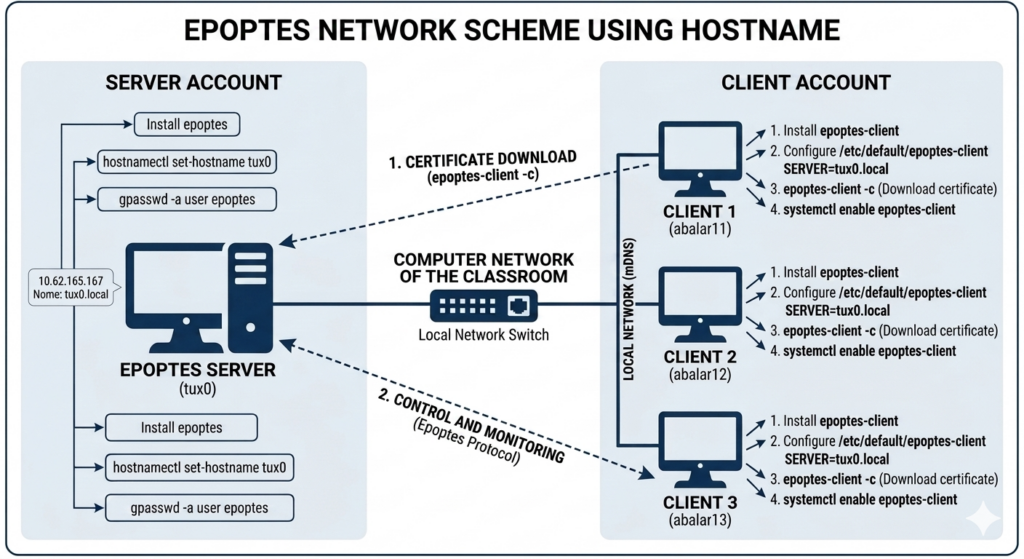
Operating Scheme
- Server (In this example, we’ll assume it has this name: tux0): Acts as the central controller and is advertised on the network through Avahi.
- Name Resolution: Devices are located using the .local suffix (tux0.local).
- Clients: Connect to the server’s name, validate the security certificate, and start the service automatically on each startup.
Host Name Management
Since the IP is dynamic and can change, the host name is the only reliable identifier on the network. For the system to work, the server must have a unique and recognizable name.
Procedure to Change the Host Name
If your server or clients do not have the correct name, you need to modify it in the following files:
- /etc/hostname file: This file contains only the host name.
sudo nano /etc/hostname(Delete the current name and typetux0) - /etc/hosts file: You must update the line associated with the loopback to match the new name.
sudo nano /etc/hostsModify the line:127.0.1.1 old_nameto127.0.1.1 tux0 - Apply without rebooting:
sudo hostnamectl set-hostname tux0
STEP 1: Server Configuration
The server is the station from which classroom control is exercised.
- Identify the network interface: To check the network status, use the command:
ip a - Installation and configuration script: Create the
server_setup.shfile and run it with superuser privileges:
#!/bin/bash
if [ "$EUID" -ne 0 ]; then echo "Error: run with sudo"; exit 1; fi

# Package installation
apt update && apt install -y epoptes avahi-daemon

# Ensure host name
hostnamectl set-hostname tux0

# User permission management
# Add the user who launched the script to the epoptes group
REAL_USER=${SUDO_USER:-$USER}
gpasswd -a "$REAL_USER" epoptes

echo "Server configuration completed. Reboot the device."
STEP 2: Client Configuration
This must be executed on each student’s station.
- System path correction: If the system does not locate binaries in /sbin, add them to the user’s PATH:
echo 'export PATH=$PATH:/usr/local/sbin:/usr/sbin:/sbin' >> ~/.bashrc && source ~/.bashrc - Client setup script: Create the
client_setup.shfile with the following content:
#!/bin/bash

# Definition of the mDNS server name

SERVER_NAME="tux0.local"

# 1. Verify if the script is executed as root

if [ "$EUID" -ne 0 ]; then

  echo "Error: Please run the script with sudo (sudo ./config_client_name.sh)"

  exit 1

fi

# Add administration paths to the PATH of the current script session

export PATH=$PATH:/usr/local/sbin:/usr/sbin:/sbin

echo "--- Starting automatic Epoptes client configuration ---"

# 2. Repository update and installation

# Install avahi-daemon so the client can resolve the .local name

echo "[1/5] Installing required packages (epoptes-client, avahi, net-tools)..."

apt update && apt install -y epoptes-client avahi-daemon net-tools

# 3. Configuration of the /etc/hosts file (Optional with Avahi, but recommended for security)

# Note: With the use of .local, the system will automatically search the network without needing a fixed IP

echo "[2/5] Cleaning previous hosts configurations..."

sed -i '/tux0/d' /etc/hosts

sed -i '/server/d' /etc/hosts

# 4. Configuration of the default Epoptes file

echo "[3/5] Adjusting configuration to connect to $SERVER_NAME..."

if [ -f /etc/default/epoptes-client ]; then

    # Replace any previous configuration with the name of our server

    sed -i "s/^#SERVER=.*/SERVER=$SERVER_NAME/" /etc/default/epoptes-client

    sed -i "s/^SERVER=.*/SERVER=$SERVER_NAME/" /etc/default/epoptes-client

else

    echo "SERVER=$SERVER_NAME" > /etc/default/epoptes-client

fi

# 5. Download the certificate from the server

# The server must be powered on and the Epoptes application must be open

echo "[4/5] Downloading security certificate from $SERVER_NAME..."

/usr/sbin/epoptes-client -c

# 6. Enable and start the service

echo "[5/5] Enabling the service for automatic startup..."

systemctl enable epoptes-client

systemctl restart epoptes-client

echo "---"

echo "PROCESS COMPLETED SUCCESSFULLY."

echo "The client should now appear in the server console ($SERVER_NAME)."

echo "If the certificate failed, make sure the server is named 'tux0'."
STEP 3: Connection Verification
- On the Server: Start the graphical interface by running
epoptesor searching for the application in the Education menu. - On the Client: Check that the service is running with the command
systemctl status epoptes-client. - Troubleshooting: If the client does not appear, verify mDNS connectivity by pinging:
ping tux0.localIf it responds but does not connect, repeat the certificate download:sudo epoptes-client -c.